Your donations make more tutorials possible. Thanks!
Looking for more?
I highly recommend:
Once you have a model on a 3D layer in PS CS4 Extended, you might want to change the lighting.
Watch the movie to find out how. (You can download the movie, if you have trouble watching on line. You can also download an .rtf file with the transcript, if you'd like one.)
(If you'd like to go right to the movie about Moving the Model, it's here.)
You can find the controls for lights in the 3D panel. (If you don't have it visible, you'll find it in Window > 3D, at the very top of the menu.)
You can get to the Lights pane by clicking the Light bulb icon, on the right side of the Icon Row on the top of the Panel.
From there, you can change the Intensity, change the Color, and more.
Add Lights by using the New icon (it's the square with a folded corner that means "new" in most Adobe applications.) Delete them by using the familiar Trash icon.
You can toggle the Light Guides (graphic representations of your lights) on and off, using the Lights icon just to the left of the New one. That can be a great help, when you want to position your lights.
The tools to move the lights are in a vertical row, on the left side of the Light pane.
There is more information in the Accordion below.
 This is the place to work with the lights for your 3D Layer.
To get to it, click the Light Button of the 3D Panel.
The lights are listed by Type; Point Lights, Spot Lights, and Infinite Lights. To change what a light is called, double click on the name in the List, and type in whatever name you desire. You can enable or disable the Visibility of a light by clicking the Eyeball icon next to its name. Lights that aren't visible will cast no light in the scene, of course; so this is a good way to tell what is lighting what.
To Select a light, click on its name in the list. It will have a blue highlight, and its attributes will appear in the bottom section of the panel.
To change a light from one type to another, choose the type you would like from the Light Type Dropdown menu, in the top of the Light Properties section of the panel. The type will change, and the light will move to the correct type in the List.
To change the Intensity of a light, type the desired intensity into the Intensity field. To change the intensity interactively, click the blue button to the right of the Intensity field to expose the slider, and drag the slider bar, (or just drag on the word "Intensity".)
To change the Color of a light, click the Color swatch, and choose a new color with the Color Picker.
If you'd like the light to cast shadows, enable Create Shadows by clicking the checkbox. That will cause everything in that 3D layer to cast shadows on other things in that layer. (It won't affect other 3D layers that might be in the same document.) You can determine Shadow Softness in the field below that. Note that you may or may not see the shadows, depending on the Render settings you have selected.
To move the selected light, click the button to get the appropriate light move tool, and then drag in the image window to change the light. To use the specialized tools (Aim at Origin and Light to Camera) see the sections below. Note that all the tools might not be available, depending on the type of light you have selected.
To make a New Light, click the New Light button at the bottom of the Panel, and choose the type of light you would like to create.
To Delete a light, Select it, and click the Trash can icon.
To Toggle the Light Guides on and off, use the button at the bottom of the Panel. It will be depressed (shaded) when they are on, and not when they are off.
 Point lights are like a candle flame, or a naked light bulb. They have a position in 3D space, but they don't point in any particular direction; the light goes in all directions from a single point in space, (which is how they get their name.)
Point lights can cast shadows (if enabled) and they have Attenuation (if enabled.)
Attenuation determines how the light fades over distance. Anything that's within the Inner limit receives the maximum light intensity. Anything beyond the Outer limit (no, not the TV Show) isn't lit by this light at all. Things between the two limits are partially lit, depending on distance, of course.
This image shows a Point Light with Attenuation enabled, and the Guides showing. The cyan bulb at the very center is the light position. The yellow is the Light Color. The inner cyan sphere shows the Inner Limit, and the outer cyan sphere shows the Outer Limit.
 Spotlights come from a specific place in the scene, and point a specific direction.
They may cast shadows, (if enabled.)
They have a Hotspot, where the light is at maximum intensity, measured in degrees from the center of the light, and a Falloff, where the light gradually fades from maximum intensity to nothing, also measured in degrees.
In addition, they may have Attenuation (if enabled) which determines how quickly the light fades. Anything that's closer to the light than the Inner limit is lit at maximum intensity, anything that's farther than the Outer limit isn't lit at all. In between, of course, the light fades.
The image shows a Spot Light with Attenuation enabled, and the Guides showing. The cyan Arrow shows the light position. The yellow shows the Light Color. The cyan ring that's closest to the light shows the Inner Limit, and the cyan ring that's at the edge of the light cone shows the Outer Limit. There is no graphical representation of the hot spot; but the cone itself shows the Falloff.
 Infinite Lights are like Sunlight. They have a direction, and may cast shadows (if enabled) but they have no Falloff, and no Attenuation.
They also have no placement on the X,Y, and Z axes, and so if you enable Light Guides they will always appear in the middle of your scene. If you have several, as pictured here, the light "beams" will cross at the scene origin point.
The image shows two infinite lights. The white and yellow lines are the light "beams" and show the color of the light. The direction is always away from the cyan light emitter. (In other words, the yellow light will light things from the top left, not from the bottom right.)
 You can move the lights using the tools on the left side of the Light Properties portion of the Panel.
Different ones will be enabled, depending on the Light Type you have selected. (You can't rotate Point Lights, since they are non-directional, and you can't do anything with Infinite Lights except rotate them, since they light the entire scene evenly, and only Rotation matters.)
Rotate will move the light around its own axis.
Drag will move the light up and down, and from side to side. (Which axes those are will depend on what your normal 3D application considers the vertical axis; either Y (most things) or Z (Second Life®, and a few others,) so to avoid confusion, I'm not naming the axes.)
Slide will move the light back and forth, farther away from you, and closer to you, as well as moving from side to side.
If you'd like to move on a single axes only, Select the light, and then use the Axis Tool. (See Movement in 3D Layers for more details.)
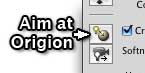 Clicking this button will cause the selected Spotlight to point at the center of the 3D scene.
Note: this isn't the center of the model, as you might think from the Adobe documentation. If you move the model, it will have no effect on where the light points. It points at the origin of the scene, which is where the center of the model was when it was imported into PS, not where it is now.
This doesn't cause the light to always point at the origin, either. If you move the light, it will no longer point at the Origin. If you want it to do so, you have to click the button again.
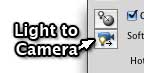 Clicking this button will cause the light to move to the position of the current Camera. In other words, it'll put it directly "behind" you, so that it lights the scene evenly from your point of view. It works with all light types. (The Infinite Light doesn't actually move, of course, but the light angle assumes the direction that the camera is pointing, so it still works.).
If you change your camera, the lights will remain where they are. They don't move along with you.
Because of that, this is a great way to quickly and easily get the lights to point where you want them to! Just move the camera so you can see the area of the model that you want illuminated, and then click this button. The light will take that position and direction. (You might want to Save the camera position first, if you already have it set up for your image. Then just return to the Saved position after moving the light.)
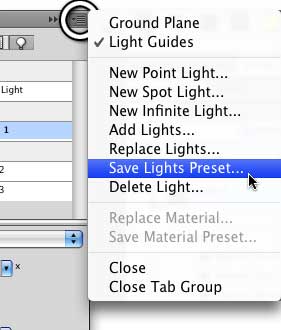 Once you have your lights set up exactly the way you want them, you can save them for using in other scenes.
To do so, simply click on the fly-out menu, in the top right corner of the 3D Panel, and choose "Save Lights Preset... " from the menu. Then browse to where you want to save the lights, give them a name, and save them. By default, Photoshop will open the Lights Preset folder. If you save them in there, they'll be easily accessible; but you can save them wherever you like, of course.
To use a preset, just choose Replace Lights... from the menu. By default, that will go to the Lights Preset folder, and you'll find that there are already a number of preset lights in there.
Choose one, and all the lights in your scene will be replaced by the light set you've chosen.
To add the lights from a preset to the ones you have, without making the current lights go away, choose "Add Lights... " from the menu. The lights from whatever preset you choose will be added to the ones already in the scene.
Note: if you would like to see the information in the Accordion when printing the page, disable Javascript in your Browser, and reload the page. You should see all the Accordion panels open before you print.